SLIDES: On the 38A there are three different slides: The passenger side wall slide, the BIG one, is hydraulic with cables/chains for alignment. STAND CLEAR. It moves “with purpose”…. fast and strong. It WILL destroy anything in it’s path. (Don’t ask) It changes the volume of the interior a LOT. This air will need to come in/go out depending on whether you’re extending or retracting…. Open the door, or at least a hatch to make it easier on the thing.
The bedroom slide is electric (Equalizer Systems) with one toothed track and a motor with sprocket. The box is relatively light. There’s been numerous repots of bolts stripping/coming loose/out from other owners. So far, so good, I keep an eye on them. (Update…. there’s a gear in the gearbox that strips….. see below).
The kitchen slide……Ah yes, the infamous SCHWINTEK slide. Recognizable by the toothed strips on either outside of the box, top and bottom. Behind the seal on the sides there are vertical rods with sprockets on them. There are motors. There’s a control box in the basement. It is under powered, and it has a brain…..which means it can get out of alignment. (Or so it thinks). There’s a really good video on Youtube from Lippert (Yeah, those guys). Search “Schwintek slide alignment.” and “Motor Replacement” Bottom line is: Operate with shore power on, or engine or generator running so as to have maximum voltage/amps for the motors. Do not try to slide it “uphill”. Tilt the coach using the levelers if you have to when it runs out of steam. Operate it ALL THE WAY open or closed, and then hold the switch another 5 seconds. This re-aligns the brain, whether it needs it or not. Lubricate it, and there’s Youtube videos on that too. And, for me it works best when I operate it while “on the bags” and NOT after auto leveling. Which brings us to……
WHAT FIRST, LEVELERS OR SLIDES Which sequence to extend/retract slides and extend/retract levelers. VERY STRONG opinions vary, and to one side’s credit, in the leveler manual it does say to build up air before retracting levelers, and also to operate the levelers before operating slides. Well, like I said, the kitchen (Schwintek) slide moves noticeably poorer when on the levelers. Personally I feel that the bus was made sitting on it’s suspension (inflated or not doesn’t matter) and that the twisting that audibly occurs during leveling can change the fit of the slides. Of course the caveat is that the coach is reasonably level to begin with. Pushing or pulling a slide “uphill” would put increased strain on the activating mechanism. Sooooo I called the leveler people and they said “We put in the book what the manufacturer wants. Some want levelers first then slides, some want it the other way around”. Interesting…….Sooo, then I put the question to Forest River they said “Do what works for you.” I like that answer.
The wall and kitchen slides are on rollers. (Get under there on the outside and you’ll see them. These make indentations and eventually cracks in the underside of the slides. It’s under engineered. Forest River is aware and if you call them to report the damage being done they will ask you to measure, and then they will send you plates to put under there to catch the load from the rollers. Mine are in the mail. I will write up when I put them in.
MAIN SLIDE issues. The main slide is operated by a large hydraulic ram underneath. There is a system of cables/chains and sprockets to keep it moving evenly. How exactly I don’t know yet, I haven’t had to deal with it YET. Friends had problems. There’s a pin with two sprockets around which chains run on the wall just to the left of the bunks on the 38A. You can’t see it because the fascia on the slide is in the way. You CAN see it from the end of the slide when retracted. Look on top of the slide from the copilots seat. And (nifty trick) your iPhone can peek over the top of the fascia and take a picture! Here’s what a friend’s looked like when the slide stopped moving properly:
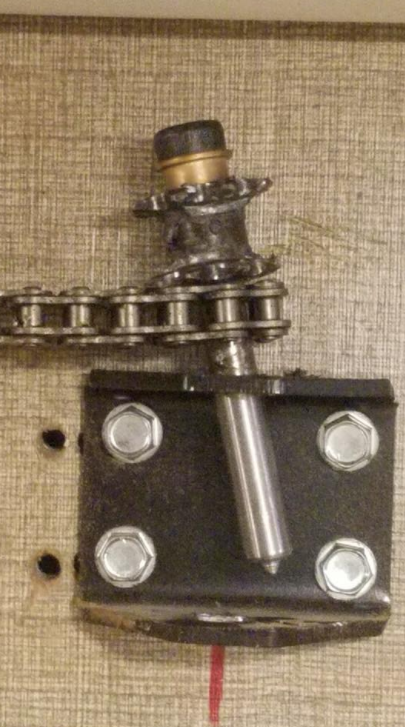
Judging by the extra holes the “technician” that put this together was not having a good day. Here’s what mine looks like (for now)……
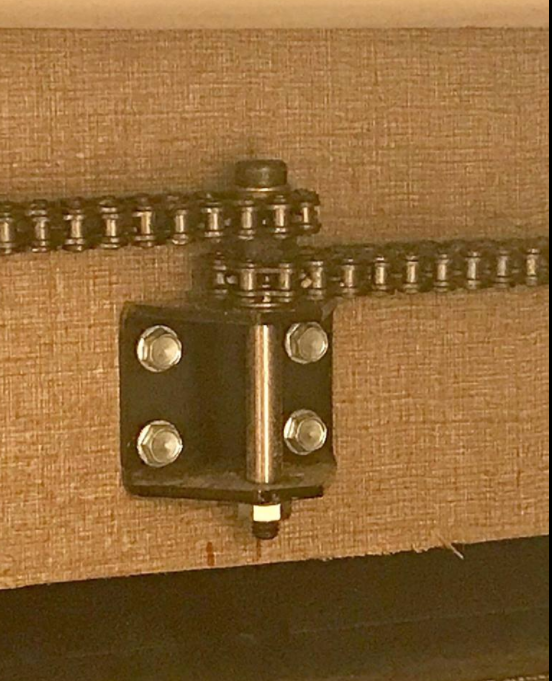
I’ll be keeping a close eye on this one!
MAIN SLIDE CREEP.
This failure pops up on social media with fair regularity, and it was my turn. You stop for fuel and suddenly notice the coach is 4 inches wider. As in the wall slide has worked its way out while you were driving. There are two causes cited when this happens. Air in the hydraulic system or a failing internal seal on the hydraulic actuator. There is a bleeding procedure which has you extend and hold, retract and hold, check for bubbles in the reservoir (good luck with that) rinse and repeat until no bubbles. Apparently the system is NOT self bleeding. well, I’m not going to stand there and repeatedly operate the slide. I’m waiting for this thing to bust any day and I’m “spending” my limited number of operations wisely. I do hold the button for a little after it hits the stops and occasionally check for bubbles. Haven’t found any. So I think the seal on the actuator (basically a hydraulic piston, like on a backhoe) may be leaking internally. It doesn’t do it every time and I can see it happening in the mirror. (I look for it now). In the meantime I’ve made a “lock”. I understand newer coaches now come with these, a testament to the solid slide engineering. (Note sarcasm). You can also make them from 2×4’s like I did. The bottom line is that if you have a failure on any slide you try to get it in manually and then lock it in place so you can get home. This one rests on the bottom alignment cable. Note the color….. I don’t even want to THINK about the damage that would be caused if I left it in and hit the button…..


______________________________________________________________________________________________________
Bedroom slide failure.
Doink-doink-doink…… every half second when sliding in or out. Had an assistant operate the switch while close to the mechanism and it was coming out of the motor. Soooo, out it comes. First I removed the relay block that’s on the wall behind it, so you can move it out further before disconnecting the wires and take good note of where they go. Not sure why they needed 1/4″ x 1-1/2 ” lag bolts to secure the relays, but oh well.
Next there’s 4 bolts that hold the motor in.

And it’s out.

Ran it just like that and could feel the doink-doink-doink…….. So, on the bench and took the cover off the gear box. Found a small gear missing a tooth…….

Part number on the thing was K01348F500 by the Klauber Machine and Gear Co. Called them and this is when it got ugly. “It’s proprietary.” “Who for?” “Equalizer Systems”….. Ah, those people. We know them. So I called them and they said I needed the whole thing for $680.0. Guess they had me by the short hairs so I ordered it. Will try to fix the old one (have some ideas there) and keep it as a spare……
