That is the Light Bar Control Unit. It’s the display in front of the driver’s seat with all the little colored indicators and the three bar LCD (Liquid Crystal Display). It’s the latter that this writeup is about. It and the 4-way joy stick on the left console are the interface between you and a surprising amount of information. Understanding the menu structure and joy stick commands makes it a whole lot easier to get along with this thing and to use it to it’s fullest, and it’s actually pretty cool. There are instructions in the manual, but they are not the easiest to follow……. These tips are my best efforts to date. There may be omissions, there may be a mistake or three, I will fix as I discover them. It will be a work in progress… So here goes:
NOTE: I have asked Freightliner, and unlike your gas automobile of 20 years ago where you ran the risk of burning out the coil, there is no risk in sitting with the ignition on but engine off to take your time and program the LCBU. Of course if your air is low that warning will not shut up so you’ll have to run it to build air before you shut it off again.
Summary:
There’s a SETUP menu and a DRIVING menu (normally displayed). While in the DRIVING menu you can customize each of 7 lines to display one of 5 categories. Once that’s done you can use the joystick to scroll through the 7 lines and display any 3 consecutive lines at one time and then scroll through the highlighted one for more information in that category……
When you first start up the engine, after the welcome screen, you will see any warnings or maintenance messages. “Low Fuel” or “Change oil soon”….. Click left one at a time to get past those. (The low voltage thing may appear, be cleared and then may come back a few times…. see here: Tricks And Techniques second item)
Next the “check list” appears. It’s a list of items you need to not forget to do before you commence the motion lest noisy, and expensive, things happen…. Disconnecting water/electric/ and sewer for instance. The list can be customized to your liking, more on that later. For now you can do two things: Using the joy stick scroll down and click right on each item when done until the list is done and it goes away. Or, click left and skip the whole thing.
From this point onward, it is important to realize that there are TWO menus: The DRIVING MENU, or as FL calls it the “FAVORITES DISPLAY”, which is customized WITHIN ITSELF, and the SETUP MENU which controls other things. On the DRVING/FAVORITE MENU there are 7 lines of information which, again, can be customized, more on that later, any THREE consecutive of which can be seen at the same time. When you click down you scroll through the 7 lines. One by one they are highlighted. If you do nothing they become un-highlighted in a few (5-7?) seconds. Clicking/holding left and right has a variety of functions in these menus.
FIRST…… The SETUP menu. With the DRIVING MENU displayed (no checklist, no warnings or maintenance reminders) and NO LINE HIGHLIGHTED (just wait a few seconds if there is) click and hold right with the joy stick. This will bring up the top menu:
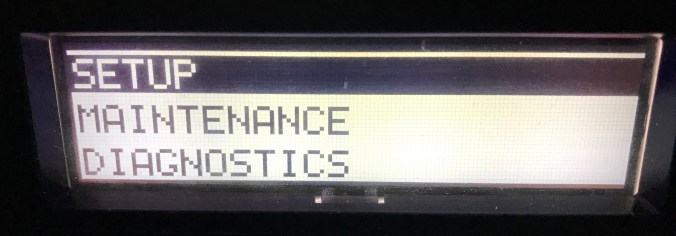
Click up and down to scroll and highlight and then click right on any of these three to enter that section.
- In the SETUP menu you can set the clock, choose between standard and metric, customize the checklist, see here: Programming the electronic checklist and a few other things…..
- In the MAINTENANCE menu you can set reminders for oil, air cleaner changes and a few other things.
- In the DIAGNOSTICS menu you can see/research error codes the beast may throw at you……
In due time I may delve further into these, but for now you’ll have to refer to the book if you want to set the clock or oil change reminders. (There are factory settings in effect).
Again, even though you enter it through the driving menu THIS MENU IS NOT USED TO CUSTOMIZE THE DRIVING MENU. click left to exit your way back to the driving menu.
CUSTOMIZING THE DRIVING MENU:
While in the DRIVING MENU scroll down to any of the SEVEN lines and WHILE IT IS HIGHLIGHTED click and hold right to display the following editor menu which will allow you to customize THAT LINE. Scroll to the category you want to display (described below) and right click to select it. It will now be displayed on the line you were on when you entered this menu.
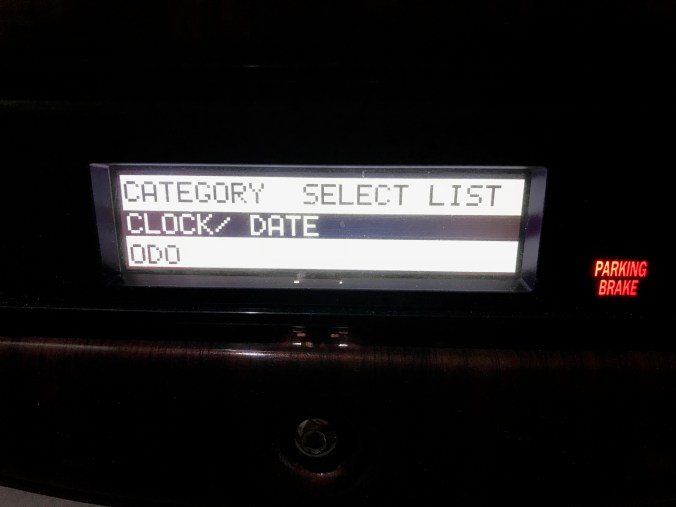
There are NINE different “categories” that can be displayed on any of the seven lines. Within SOME of the categories, and OUT OF SETUP AND IN DISPLAY MODE there are multiple pieces of information that you can scroll through. Here is, to the best of my ability the structure:
- Clock/Date
- Odometer (It is possible but not verified that at least ONE of the 7 lines has to have the odometer on it….. )
- Compass/Temperature. Your unit may have this activated, mine doesn’t, per FL, so sorry.
- TRIP….. A progress counter. RESETTABLE. Contains further information which can be displayed once assigned to a line and OUT OF SETUP MODE.
- LEG…… EXACTLY the same as 4……different name.
- TODAY…… EXACTLY the same as 4 and 5, different name.
- ENGINE DATA What it says….. and just like the progress counters, once assigned more information can be displayed once out of setup mode.
- TRANSMISSION DATA What it says, and more data can be displayed again later.
- Generator hours. Your unit may have this activated, mine doesn’t, per FL so sorry.
Now, lets sort this list into FIVE essentials:
- CLOCK
- ODOMETER
- PROGRESS COUNTERS
- ENGINE
- TRANSMISSION
(Compass/Temp and Generator Hours being inop) Let’s look at them more closely:
- CLOCK….. is clock. Set it in the Settings menu as described above.
- ODOMETER is odometer. The more fun you have, the faster it counts up.
- Progress counters. TRIP, LEG, TODAY. These are RESETTABLE by clicking left when OUT OF SETUP mode and in regular DRIVER DISPLAY mode. When is up to you, but I follow the lead of the names and reset all at the beginning of a trip, and LEG and TODAY as the trip progresses. Now it gets interesting. WITHIN these progress counters is a lot more info. Again, WHEN YOU ARE OUT OF SETUP MODE if you click right (do not hold) while highlighted you will scroll through: DISTANCE/TIME/FUEL USED/ECONOMY/AVERAGE SPEED and IDLE TIME for that counter…….
- ENGINE data. Same as progress counters, WHEN OUT OF SETUP MODE, and WHEN HIGHLIGHTED you can click right to see a whole bunch of stuff, some of which, like RPM/Voltage/Engine temp etc etc are already in front of you in analog format. There are also a few cool things that are nowhere else, like FUEL USED to date (a scary number), INSTANT FUEL ECONOMY, ENGINE HOURS, ROAD SPEED (same as your speedometer), and a very cool one: CRUISE SPEED which is the speed your cruise control is set for.
- TRANSMISSION data. Again, when out of setup mode and with this line highlighted you can display TRANSMISSION TEMP or the GEAR you are in.
So there, FIVE groups of data with their sub groups. Once again, with the display in the DRIVING (or FAVORITE) MENU scroll down to one of the SEVEN lines you want to change, click right and hold to enter the CATEGORY SELECT LIST. Scroll down to the category you want to display on this line of the DRIVING MENU and click right to select it. Click left to make your way out of SETUP, wait for the line to UN-HIGHLIGHT itself and you are back in the DRIVER/FAVORITE DISLAY MENU. Once you have assigned all your lines, those set to a progress counter, engine or transmission data can be scrolled through for more information, and the progress counters can be reset.
I will now describe how I have mine set up and why. You could do the same thing and then modify as you wish. Or you can start from scratch. I hope that the description above puts it all in a way you can get your head around more easily. I have a few up front criteria/considerations for setup:
- I want to be able to get to ALL available information
- I want to see a few VERY important things right in front of me, so they have to be on three consecutive lines so I can see them at once.
- I don’t care for the clock. There are 17 clocks within five feet of me on phones, iPads etc. etc. Not wasting a line on it.
So here’s what I have:
- ODOMETER Gotta be somewhere, might as well put it on top.
- TRIP….. click right to scroll through the trip information as described above, like fuel economy, time on the road etc. I leave it in TRIP so I know what line I’m on. It is not one of the three lines I keep on display.
- LEG…… same as 2.
- TODAY The top of my “three in view”. Reset each morning it tells me how many miles I’ve crunched today and is part of the mental math, together with the “to go” miles from the GPS/NAV, to figure halfway point etc. etc. Again, scroll through to see how the fuel is doing today, time on the road today etc. etc.
- TRANSMISSION The second line of my “three in view”, specifically scrolled to TEMP. The other piece of info you can click right scroll to is GEAR, but I can see which gear I’m in on the transmission control on the left console. I DO want to know how hot my tranny is running, especially when towing. I want to know EARLY if it’s getting toasty.
- ENGINE, specifically scrolled to CRUISE. The third of my “three in view” I find this most handy. In the newer cars it’s in the driver displays. It tells you what speed you have your cruise control set for, so that when you “resume” it will go to that speed. I use cruise a lot, and I will increase/decrease frequently to adjust for traffic/road condotions. Working the pedal for hours causes me pain in my foot/leg and the more time it spends relaxed off the pedal the better. So, hit resume, check/adjust the number and back to cruising. No wondering what it’s going to do/surprises…….very handy.
- ENGINE. Again, lot of stuff that’s already in front of you, but some that’s not. I scroll through it once in a while, usually leave it on VOLTAGE so I can see the dance when I start up. This line is not one of my “three in view”.
So there you have it. There’s a SETUP menu and a DRIVING menu. While in the DRIVING menu you can customize each of 7 lines to display one of 5 categories. Once that’s done you can display any 3 consecutive lines and scroll through some of the highlighted ones for more information in that category……
Lastly…. an attempt to put the menus and their relationship into a graphical format:

Hope this helps.
March 2021….. So came to this little tidbit. Mileage is a regular discussion on social media. ANd the range is rather large. Now, there are a LOT of variables, including but not limited to weight, if and what you are towing, how heavy your foot is, the terrain, temperature and wind, state of maintenance of your engine. There’s more. But, like ALL statistics, the larger the data set the more accurate the results. Soooo, if you have an engine line in your favorites/driving menu you can right click through all the digital engine parameters as described above and you will come upon…. fuel used. All of it. Since day 1. (Do not multiply by the per gallon price….. you will be sad) But what you CAN do is divide this number into the number on the odometer….. so in my case:
43,923 miles driven burning 4829 gallons of diesel = 43923 / 4829 = 9.09567198 mpg.
(Note that the gallons above do not include generator usage….. that’s another story.)
