Where to start with this one……Well, it’s one of only two aspects of our otherwise awesome motorhome that I found completely, utterly and blatantly unsatisfactory. (The other one being keeping the cabin warm when traveling in very cold weather) Now, before you start handing me meds to calm down I will tell you that there are DROVES of Berkshire owners on various social media that are pulling their hair out. Hmmmmm, LOTS of smoke. Yes, there’s fire.
Here’s the way the story reads in my head right now. Remember on page one where I said that after you make the jump to the diesel pusher there are incremental price jumps with features? Well, a few notches above our Berkshires the designers are incorporating very snazzy hydronic systems, like the one made by Aqua-Hot. Instant hot water using diesel or electricity. Endless showers, heated floors. Works like a charm, NOT cheap. Somewhere some designer/manufacturer thought that a tankless propane hot water heater would provide (almost) the same luxury for a fraction of the price. Not only that, it would save space and weight (both precious commodities in RV design). Enter the Girard, Suburban, Atwood and Truma on-demand water heaters. They all started doing it. Forest River equipped the Berkshire with the Gerard 1, then the 2, then the 3 then the Atwood and finally the Truma. Except for the latter they have had problems with all of them. Some they replaced, some they didn’t. The Romans figured out hot and cold running water 2000 years ago. For decades we’ve been perfectly happy with tanks in RV’s. 6 gallons was marginal, 10 gallons was plenty, especially if it was propane and electric both. The on demand pieces of you know what should not have been installed in these units. They know it. They told me so. (Off the record).
I’ll speak for the Atwood installed in the Dragonship only here. It senses water flow and then the flames come on. More flow, higher flames. Less flow, lower flames. In theory the flame height is designed to produce a consistent delta T (rise in temperature) of up to 65ºF (in wintertime) at 1.00 to 1.25 gpm. It doesn’t. (In summer you’re supposed to tweak this down as the water is already a lot warmer). It says it will work at .5gpm or more. It doesn’t always. The on board pump is more than adequate. (See testing below.) The Atwood manual advises a bunch of things like removing all restrictions from the plumbing. I did, although the kitchen faucet has built in restrictions that are not removable. (edit…they are removable, keep reading) They also recommend turning faucets to “full hot” (I did). It often doesn’t work as advertised, period.
Speaking of the plumbing, the Berkshire comes with a manifold design. Hot and cold come straight to the manifold and then go to the individual stations. Very cool for a number of reasons. There are no “T”s to leak inside walls or otherwise hidden. IF something is leaking you can isolate it in seconds. Clean runs. However, long runs, very long runs. From the Atwood, across to the hot water manifold. Rough guess, 20 feet. Then it still has to go to the station, which in the case of the aft bathroom is yet another 20 or so feet. All this piping has to heat up and it can take as much as TWO minutes to get truly hot water in the back.
So here we have a heater that needs a lot of flow to come on and deliver, erratically changes flame height with flow changes, or extinguishes completely, and long long runs. If you’re in the shower it gets interesting: You make a temperature change, the flow changes. The flame height changes, and a minute plus later this change gets to your shower. It may go cold for a while until you crank it to hot and it wakes up again. Some owners have increased flow as much as possible. Removed all restrictions, installed high flow shower heads and learned to be patient while delicately tweaking the temperature. They are living with it. Getting a stream of water at the velocity and temperature you want is not going to happen. Me, if I wanted ANY hot water in the kitchen I needed to turn on the water in the half bath to get some flow going. Yes I have removed the restrictions in the faucet. There must be more somewhere. (On edit…..I found a restriction right where the handpiece flex hose connects to the fixture. After removing it the flow was much improved, this however was done AFTER all the testing/modification below) If you turn the hot water off for only a second the heater turns off. Turn it back on and it takes several seconds to light back up (if there’s enough flow). This creates several seconds of cold water. This is known as “the cold water sandwich”. Navy showers are not recommended as they use more water: it goes cold every time you shut it off and then you have to wait forever for it to heat back up. Fortunately I don’t boondock very often so this doesn’t matter to me. I do find it mildly amusing. Bottom line, this thing sucks. Forest River sent me to Atwood. Atwood said “it works fine” it just needs some adjusting. The dealer adjusted. Nope. No cigar, not even close.
As I said at the top, this is the ONLY issue that I found totally unsat with this otherwise fantastic quarter of a million dollar motor home. I think Forest River failed epically sending it out the door like this.
Sooo, enough explaining how it doesn’t work, lets MAKE it work. There were options. One, replace the Atwood with a Truma. This unit apparently has the flow/heat thing figured out. But, it does not take care of the long runs, and it is not cheap. The other option was to replace it with a tank. Problem with that is that a 10 or 15 gallon tank will not fit in the same space. A 6 will, but that’s too small. I could put it in the basement, that would work, but it would add a LOT of weight. If I wanted to have it run on propane it would have to be in the wall because of the exhaust….. where? Lose a compartment door? The space that the Atwood currently occupies would not be very useful for anything else. All of it not cheap.
Then I had an idea: Put a small(ish) electric water heater in the hot water line, close to the manifold. To be honest, this is not an original idea as it is done in residential applications on a regular basis to make up for long runs. It would buffer and maintain hot water for kitchen/sink /washer use. Quicker and reliable. For showers, and with the Atwood on, the incoming water would be pre-heated but in the “Mixing Chamber” temperature bumps would be evened out. Still, unlimited hot water. The water in the tank could be heated electrically, or it could be “charged” with hot water from the Atwood. Once hot electricity would maintain the relatively small amount. No need to run the propane unless you needed a lot of hot water, like for a shower. The best of both worlds. Yes it adds some weight and takes up space, but not as much as a big tank, it doesn’t need an exhaust and it’s more than worth it!
So, I ordered this unit. I installed it in the basement, close to the manifold.

First part was to get electricity to it. At 1500 or so watts the book calls for 12 gauge wire and a 20A breaker. The panel was full. One good option was to replace one single 20A breaker on the non-inverter powered side of the panel with a tandem (two in the space of one). Some panels allow this, some don’t. Since there were tandems on the inverter side I was optimistic. See, the tandems have a slightly different slot than the singles and will only fit on rails designed to allow them. I was lucky, it fit. From there I had to snake the wire to the basement. The path I found led through the “tunnel” (behind the toilet) through the half bath to the bottom of the left side of the cabinet in the half bath. It was tight and took some time to fish through…..To get into the bottom of the cabinet you have to remove the right plywood wall (when facing inside). It’s stapled in two places, and pries out easily. After that the same with the bottom. (I reinstalled them with small screws.) I was now on top of the back side of the water manifold, above the tanks.
Next I needed to get down. In the basement there is no access to the backside of the manifold. One option is to take the whole back wall off. This is a pain, as there is all kinds of stuff mounted on it. Also, I wanted to be able to get into that area quickly in the future. So I loosened the fasteners on the left (driver’s side) side of the back wall, and pulled it forward. Then I cut about 2 feet off. Some wiring went through a hole (the wall was installed BEFORE the unit was wired) which prevented the piece I cut from coming down. With a chisel I was able to open up the hole to the top. I re-secured the remainder of the back wall, and I now have a “hatch” I can easily remove.

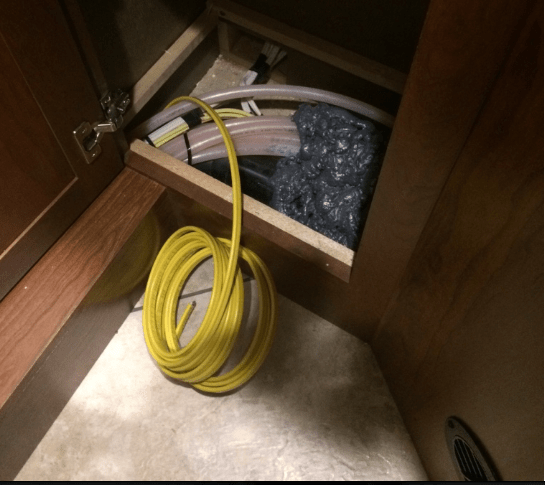
I was now looking at the bottom of the bundle of water pipes and 120V wires that went down through the floor in the bottom of the bathroom cabinet. (See pic above). The “lava mound” you see in the picture is expansion foam. It seals the hole, quite well as a matter of fact. From below I was able to gently poke a long thin screw driver up into the cabinet….I made a point on the Romex and was able to stick it down the same hole…. I was in the basement!
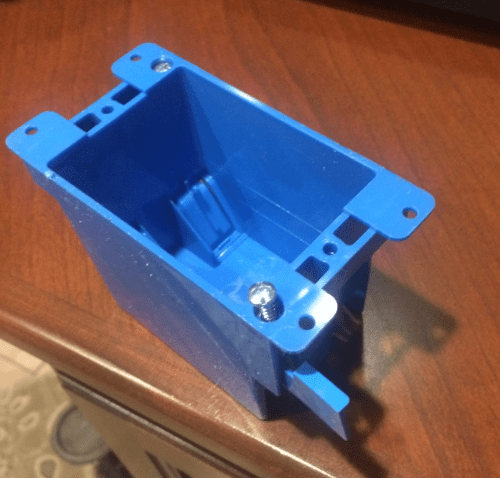
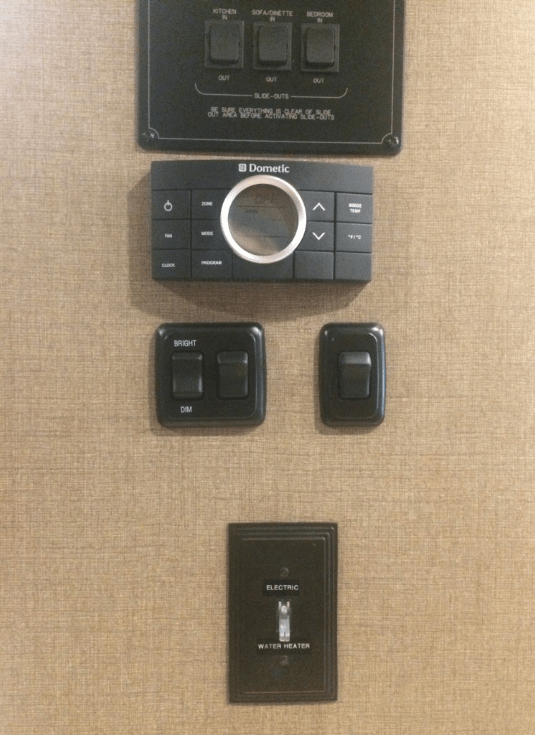
I also wanted switching. On the right side of the cabinet was a hole in the (double) wall where all the wires of the inverter remote, slide and light switches and thermostat came down. I cut a hole for a box below them and inserted one of the “winged” plastic boxes. They go through the hole, and then the screws turn the wings and secure it. I easily cut the hole with a utility knife, it’s quite thin. CAREFUL! There’s wires behind there.

_________________________________________________________________
February 8th, 2017
Today I finished the electrical, installed the tank in it’s place and connected it to the water system. Regarding the circuit breaker, I got a little deeper in to it, and there were some more changes I made. I have described those in a separate article, also under “Modifications”.
https://dragonship.blog/modifications/ac-circuit-breaker-panel/
There’s a bracket that the heater can hang on in residential applications. I attached it to the wall, bolted through with fender washers on the back, but did it so that it was sitting on the floor. Driving around there’s a lot more load on it than in a house, so all the bracket now has to do is carry a little of the load and keep it from sliding around.
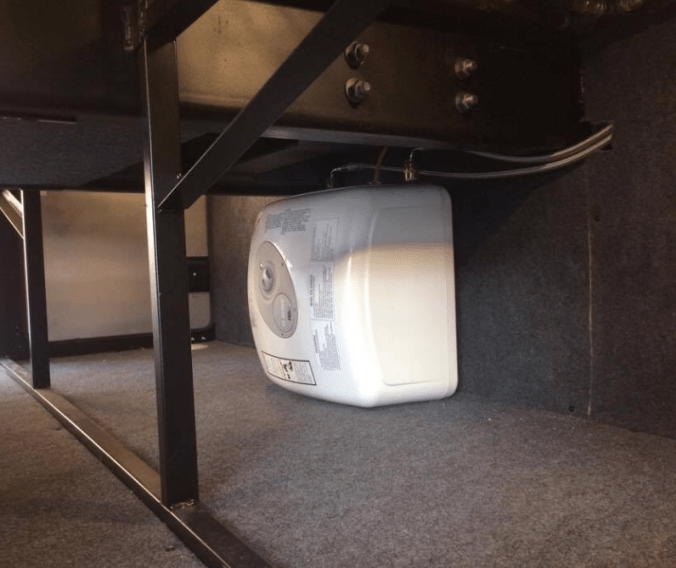
I used metal reinforced washing machine hoses. The heater is 3/4″ pipe thread, the hoses are hose thread, there’s a little piece that changes over in between. I ran them into a cutout and over the tanks into the manifold bay. Not shown yet in the picture is the PEX I connected to the blow off valve on top of the tank. It runs with the hoses and then through the floor out the bottom behind the water manifold bulkhead. Don’t want a potential blow off all over the place, plus you need to bleed the thing when filling it or the water pump takes forever to shut off…….

With a shark connector and another 3/4NPT to 3/4NHT the cold, or “in” of the water heater (blue tape) is connected to the PEX tubing coming from the Atwood. The return is connected to the manifold (red tape) where the tubing from the Atwood used to connect. So, basically the water heater is now “in line” between the manifold and the Atwood. If you disconnect both hoses and connect the feed from the Atwood to the manifold with a short piece of hose it is back to normal and you have bypassed the electric heater. This is for winterizing, or in case of failure of the electric heater. To drain the electric heater you lower the “in”, the blue tape, to below floor level and apply suction. This will siphon the water out of the electric water heater. (you also have to provide an air path in by disconnecting the red hose). Finally, there’s enough slack in the red hose to connect it (with a 3/4″hose to 3/4″hose nipple) to the main tank fill right above. This would allow you to “charge” the hot water heater with hot water from the Atwood without losing any water!
Well, testing is next….. unfortunately night time temperatures are still well below freezing, so I need a whole day to fill and heat, test and re-winterize…. Stay tuned.
_________________________________________________________________
February 14th, 2017
Electric Water Heater (EWH) mod testing.
OK, I couldn’t wait anymore as we’re going on a trip later this month so I HAD to know if, and if so how well this worked. I’ll have to winterize again later today, but thanks to the manifold I was able to keep the washer out of the loop so that will make the job a little easier.
The initial configuration was with the EWH bypassed. All running water temperature measurements were taken using an infra red “point and shoot” thermometer. Before these tests the measuring technique was verified at the kitchen sink using a high quality mercury lab thermometer. It was found to be reasonably correct.
Outdoor temperature was 40-45ºF. The one and only knob on the Atwood was set to HOT/MAX. I then partially filled the fresh water tank and subsequent testing was done using the water pump for pressure. Water tank temperature (baseline) was between 40 and 44ºF
After that I measured the water flow at the various locations (gallons per minute):
- Kitchen ………….1
- 1/2 Bath Sink……1.25
- Bathroom Sink…1.3
- Shower…………..1.6
I then moved the faucet handles until flow just reduced visibly and measured again:
- Kitchen……………0.8
- 1/2 Bath Sink…….1.1
- Bathroom Sink….1.0
- Shower……………1.25
As one can see, the flow rates are all WELL in excess of the .5 GPM minimum specified in the Atwood installation and operation manual, even at reduced rates. As a point of reference, the kitchen faucet in my house measured 1.7 gpm.

I then turned ON the Atwood, verified it’s operation, and one by one took the following measurements. In between I turned OFF the Atwood and ran each station until back to baseline cold, so that each subsequent measurement gave the full time from Atwood to faucet.
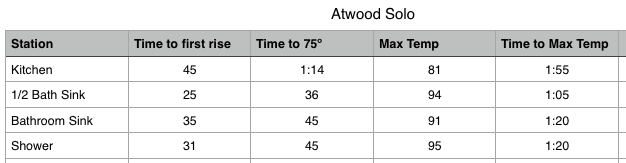
A few notes: After this test, I tested various stations again, in an irregular “household” pattern. Notably the kitchen was unable to come up to temperature several times after that, even after running for several minutes. I also did measurements at reduced flow as noted above. Temperatures fluctuated significantly. The Atwood was not able to regulate temperature to remain consistent with varying flow, as it is supposed to do. Mapping these variations would take all day. As we know shutting down, even briefly, creates the “cold sandwich”. As mentioned earlier the baseline temperature averaged 42º so the delta was 53º at best, and not the advertised 65º
The above is the performance by the Atwood as installed by Forest River and “tuned” by the dealership. Right.
I reconfigured the hoses and “plumbed” the EWH into the system. I opened the hot water manifold drain valve and with the Atwood ON ran water until no more air emerged: Just over 4 minutes. So this is the time it takes to “charge” the EWH to whatever temperature the Atwood is putting out. When I shut the drain valve the pump kept running for quite a while indicating air in the system. Opening the “blow off” valve on the EWH to let the accumulated air out solved this problem. I set the thermostat on the EWH to halfway between “desired” and “max”. After 30 minutes (possibly sooner, I wasn’t watching it that close) the light was out, indicating that the desired temperature had been reached.
I now repeated the tests performed before. I did not wait between each so the line between the EWH and manifold could cool. Subsequent testing shows one should add 2-3 seconds to the 2nd, 3rd and 4th tests, all measurements.

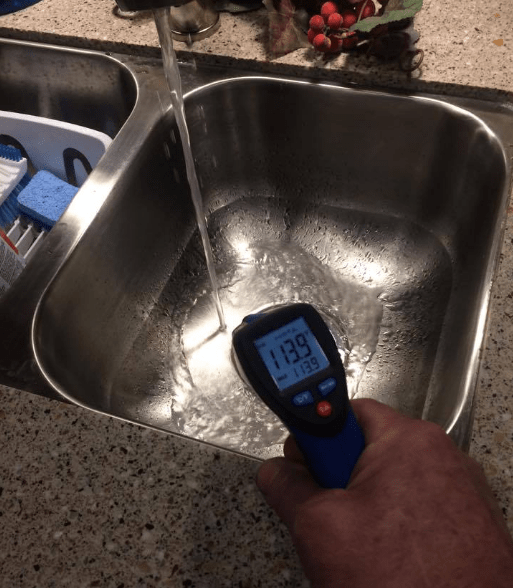
As you can see there is now HOT water at each station within 15 to 20 seconds. And, you can reduce flow or turn it off and back on and it stays HOT. As you can see from the picture the temperature will actually creep a little higher if you give it long enough.
Sooo, here we are with the kitchen and the sinks working just like at home…(actually a little faster)… YEAH! But, there was one more final and definitive test…….. The Shower!
_________________________________________________________________
Later that day……
The final test, the shower. I fired it up, got hot water in 20 or so seconds and had the temperature adjusted to where I wanted it at max flow with just a few adjustments. After that I made several small adjustments for testing purposes which took effect immediately and then staid. For a boon docking simulation I reduced flow to minimum, I could see from the pulsing of the water stream that the pump was cycling…. (I guess an accumulator is now on my list). But, temperature adjustments were minimal and consistent. Cranked it back up to max and waited. At about 5 minutes the temperature went down a few degrees, which would be consistent with the EWH depleting and the replacement water from the Atwood at 90-ish degrees coming in. But, as I had hoped there was enough mixing going on in the EWH that the outgoing water was consistent in temperature. So, with a few adjustments it was comfortable again. At 15 minutes I called it a “Hollywood Shower” and threw in the towel. (ha ha).
Conclusion: As manufactured the system was less than user friendly and at times wholly inadequate. With the modification it is now the best of all worlds. Fast, consistent hot water and plenty of it for any type of business. The EWH can be charged quickly (3 minutes) using the propane on demand. It can provide plenty of quick hot water for several hours when driving. With electric available propane can be preserved by using it only for long showers. With propane only the EWH can be charged and serve as a buffer for cooking/dishes etc.
For just about $300 and a few hours (I could do it a lot faster the second time) this is a no brainer.
I am VERY happy with this, and so is my lovely bride which makes me even MORE happy. On to the next project.
_________________________________________________________________
Epilogue:
We just spent three weeks living in the Dragonship and for the entire time the hot water system behaved as tested after the modification. Working in the kitchen there was consistently controllable water at any temperature and flow desired. Long showers, no problem. Two in a row, no problem. In fact, back in the house with it’s longer runs I am now missing the quick response!
Epilogue II:
It’s now the end of 2018 and we’ve been using this mod for almost two years. I would do this again in a heartbeat. Better than anything out there…. by far.
__________________________________________________________________
Engineering update, January 2019.
The hot water system is, still, performing like a charm. As said, I would do this again in a heartbeat. There are some features I would like to add to the plumbing though. A lot of this overlaps with Winterizing but since there’s quite a bit of engineering involved I’m describing it here.
When operating in cold weather the house is heated above the floor, SOME heat makes it into the basement. The electric water heater in the large storage bay is toasty on it’s own and I have added Wet Bay Heat. The only part of the system that is still at risk of freezing is the Atwood all the way in the back of the bus, and the lines leading to and from it through poorly heated spaces. So, the main objective here is to be able to blow out the Atwood, and then bypass it. In addition I want to be able to blow out the electric hot water heater without having to disconnect hoses. Just move valves…. More exactly, in addition to running as described above I want to be able to:
- Be able to blow out/pink just the Atwood water heater and it’s supply/return line to the wet bay without winterizing the rest of the system.
- Operate the water system with just the electric water heater and the Atwood bypassed and dry/winterized with pink.
- Blow out the Electric water heater
So, here’s what my brain cooked up:

Legend:
- Black=Isolated from system
- Blue=Cold
- Red=Hot from single heater
- Purple=Through both heaters
- Green=Compressed Air or “pink” (RV antifreeze)
Notes about blowing out with compressed air: I just use a chuck with a rubber tip on it and hold it to the cold side drain line. And, not shown on the diagram is the fact that you need to close all valves on the manifolds that are not in play.
Also, I could just hook up the pump to a “pink” bucket (standard winterization process) and pump “pink” through the Atwood and then bypass it. (Going from warm weather to cold weather). Same with the washer dryer or shower which we don’t use en-route anyways. Also, when fully winterized I can leave the Atwood, shower and washer dryer winterized and bypassed, and de-winterize the rest of the system until we get to warmer climes and then bring the Atwood on line. In fact with this setup I can winterize ANY part of the system individually. For a short trip I could de-winterize the mid toilet and the kitchen sink only…. Lots of options.
Before this mod:

So, off to Lowe’s I went and got a shopping cart full of parts pieces. Today Murphy was asleep at the wheel, the Gods were somewhere else fighting amongst each other and the laws of nature must have had a busy weekend because somewhere around 70!!! pieces went together and NOTHING LEAKED. I used PEX, with the crimp clamps. Got the tool and the cutter, $75 and worth every penny. This stuff works. It’s not the prettiest thing but it works. Ideally this would have been incorporated into the original manifold and all made out of the same stuff, but I wasn’t about to pull it all out and start from scratch….
So, now I can winterize and bypass/isolate ANY part of my plumbing system. I can configure depending on how far below freezing it’s going to get and what the exposure of the various parts of the bus is…… Of note is the fact that our propane furnace will NOT run while driving. So when it gets cold enough and the heat pump gives up we have dash heat and fireplace while rolling. OK in the salon with slides in but the back WILL get cold….
I’ll update in the while to report on how it works in reality.


